Debugging ASP.NET Core in VS 2019
This post details how I built ASP.NET Core 5 locally for much richer debugging of my web app, allowing me to step seamlessly through my code and the ASP.NET product code.
Motivation
I had been struggling to understand the way cookie authentication and OpenID Connect middleware interacted with each other, the authentication server, and my web app itself. To help understand this better, I wanted to step through the ASP.NET code locally. Being that ASP.NET Core is open source and source & symbol indexed (i.e. it can fetch the source automatically), this just works - to a degree. The trouble is that the version that ships is a release build, with lots of stuff optimized away by the compiler. This makes debugging a real pain. Here I will detail how I set up a local “Debug” build of ASP.NET Core 5 for better debugging.
Get the bits
The Build from source page in the ASP.NET Core repo goes over this in more detail, but in a nutshell, on Windows you:
- Clone the repo via
git clone https://github.com/dotnet/aspnetcore - To debug code corresponding to the 5.0.4 release,
git checkout v5.0.4 - Get all the submodules in sync via
git submodule update --init --recursive - Ensure you have the required depenencies installed.
- Windows SDK version 17134 must be installed, else you get odd errors when building.
- VS 2019 with the necessary components to build native and managed code must be installed.
- Java should be installed with the
JAVA_HOMEenviornment set correctly. (I already had this installed via an Android Studio installation). - Node.js should be installed - see https://nodejs.org/en/
- Install the Yarn package manager via
npm install -g yarn - You’ll also want the latest PowerShell release installed. See https://aka.ms/powershell-release?tag=stable
Building the bits
With the above done, restore the necessary packages and build locally via the below. Note that I had to rerun the build several times before it failed with various Yarn errors. (Looking through the issues, this seems to be a common problem)
.\restore.cmd
.\build.cmd -all -pack -arch x64
Once the build has completed successfully, the next step is to activate an environment in which you can
use the local build. Open a PowerShell command-prompt at the source root and run . .\activate.ps1. (Note
the leading dot. This is important).
At this point if you run dotnet.exe it should be using the version in the repo. (You can verify this by
running where.exe dotnet, which should list the local version first).
Using the bits
The biggest challenge was how to actually use the locally built ASP.NET Core (and related packages)
when running in Visual Studio. Especially as the package I was most interested in, Microsoft.AspNetCore.Authentication.OpenIdConnect,
is shipped as a separate NuGet package (even if built as part of the main repo). The key to this was putting
a NuGet.config file in the project root with the below contents (my ASP.NET repo is in C:\src\aspnetcore locally):
<?xml version="1.0" encoding="utf-8"?>
<configuration>
    <config>
	    <add key="globalPackagesFolder" value=".\.packages" />
	</config>
    <packageSources>
        <clear />
        <add key="AspNetDev" value="C:\src\aspnetcore\artifacts\packages\Debug\Shipping" />
        <add key="NuGet.org" value="https://api.nuget.org/v3/index.json" />
    </packageSources>
</configuration>
This does a couple of things:
- Uses a different global packages cache location, as the default one has probably already populated with release versions of packages I want to debug.
- Added the local Debug build folder for packages as a NuGet source. (Local folders are checked before web locations).
If you had been working on your web project already, delete the ./bin and ./obj folders under it
to ensure any prior binaries are removed. Then run dotnet.exe build, which should restore the packages
from the local build, (where it can), and then build the project.
Debugging the bits
The final piece was to have this work in Visual Studio 2019 for debugging. (VS Code works too, however I find for advanced debugging VS 2019 has a lot of additional nice features).
You can’t just open VS normally. You need to open from the activated environment. As I have VS 2019 Enterprise installed to the default location on my machine, this was done from the PowerShell prompt with:
& "C:\Program Files (x86)\Microsoft Visual Studio\2019\Enterprise\Common7\IDE\devenv.exe"
Another issue I noticed is that if Visual Studio builds the project, it would often restore packages
with release versions, not the local versions I configured above. (I assume it has different cache logic
somewhere). To avoid this, keep the activated environment command prompt open, and build with
dotnet.exe build whenever needed. (I also modified the Visual Studio “Tools / Options / Projects
and Solutions / Build and Run” setting to prompt when out of date, rather than build automatically on
run, to avoid any accidents).
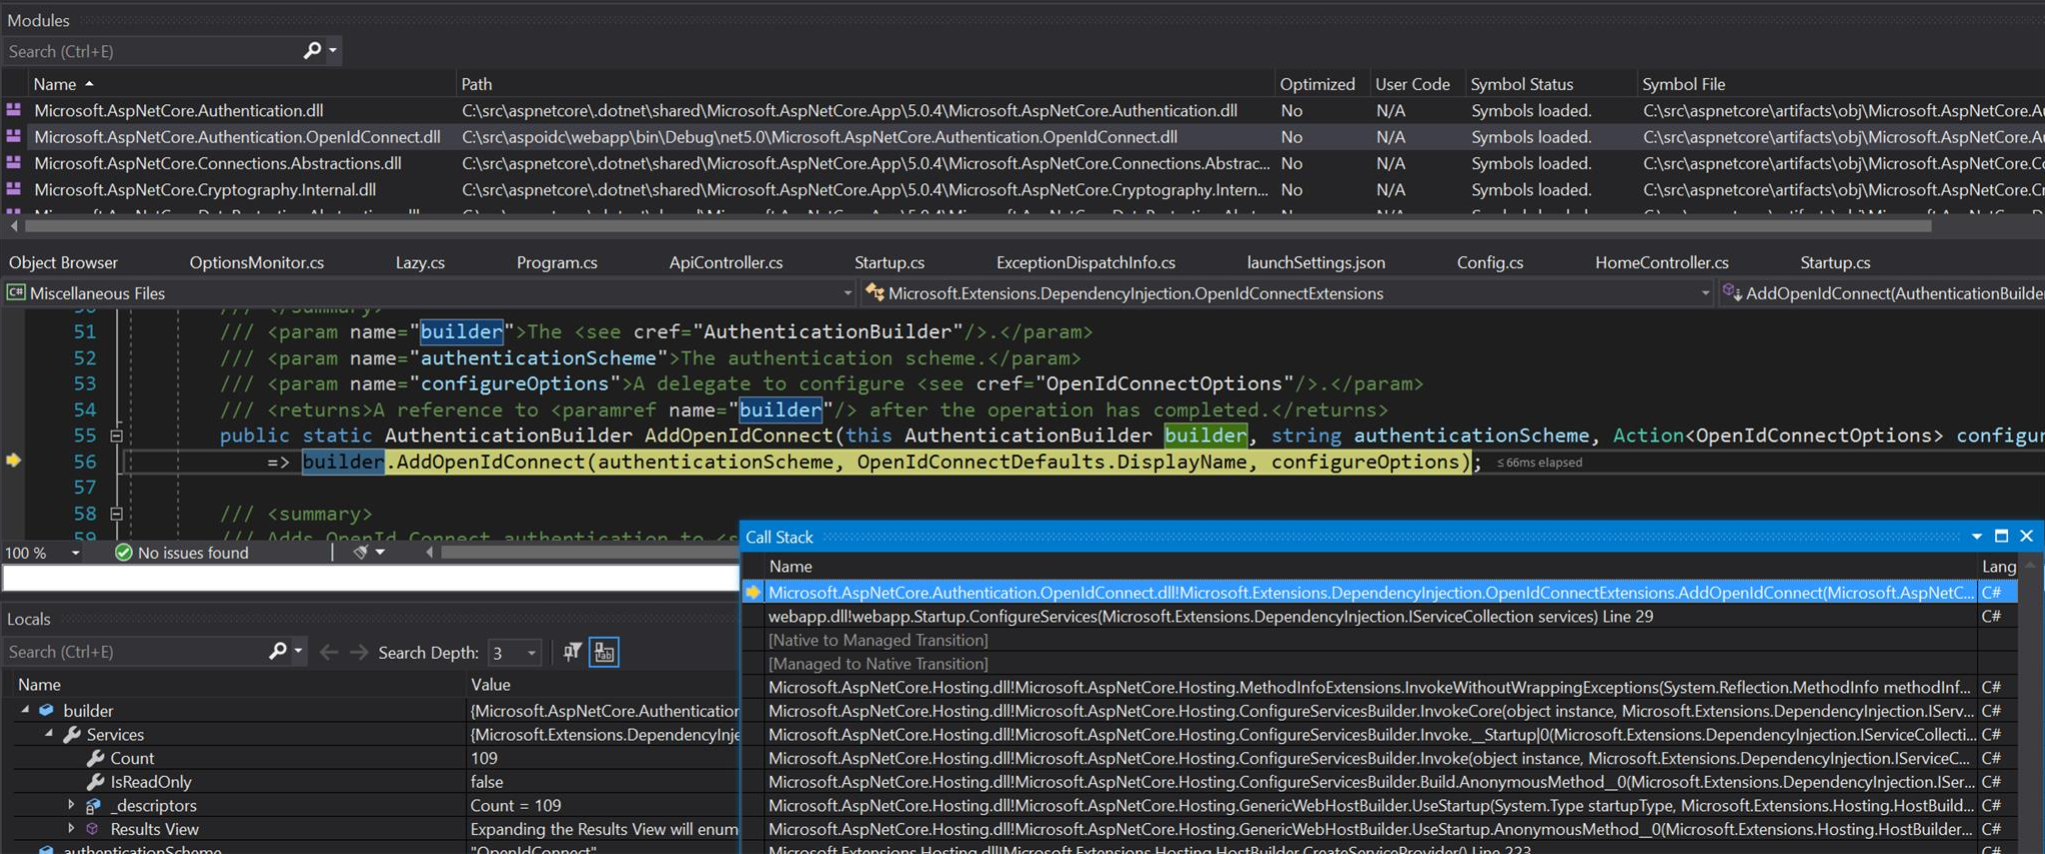
The result
With that, I was able to F5 my web app in Visual Studio and step into the various ASP.NET methods with ease, with no call stacks or locals optimized away! It’s really helped piece together some of the internals for me.